
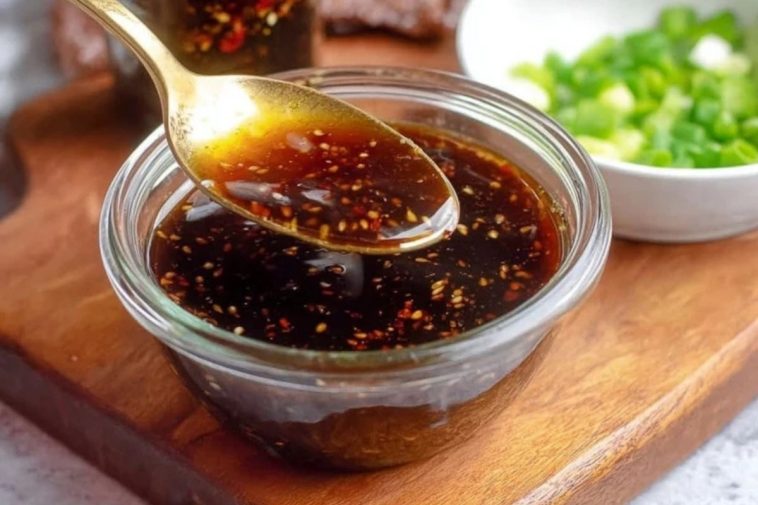

Have you ever tasted a teriyaki sauce so rich, savory, and perfectly balanced that you wanted to drizzle it on everything? This Quick Homemade Teriyaki Sauce is that game-changer. Whether you’re planning a stir-fry, marinating grilled chicken, or just need a flavorful dipping sauce, this simple recipe delivers a restaurant-style punch with ingredients you probably already have in your pantry.
The beauty of making your own teriyaki sauce is the control it gives you over flavor, consistency, and sweetness. No preservatives, no unnecessary additives—just glossy, umami-packed goodness in under 10 minutes. This sauce strikes that ideal balance of salty, sweet, and tangy with a kick of ginger and a sprinkle of sesame seeds. Once you try it, the store-bought version just won’t cut it anymore.
Preparation Phase & Tools to Use
Crafting this Quick Homemade Teriyaki Sauce doesn’t require fancy tools, but having the right ones will streamline the process and ensure your sauce turns out silky smooth:
- Small Saucepan: Crucial for heating and combining the ingredients evenly. Choose one with a heavy bottom to prevent scorching.
- Whisk: A whisk is essential to dissolve the cornstarch completely, avoiding lumps in the final sauce.
- Measuring Cups and Spoons: Precision matters when balancing flavors like soy sauce, brown sugar, and vinegar.
- Garlic Press (Optional): If you’re using fresh garlic instead of powder, a garlic press makes prep quicker and finer.
- Storage Jar or Glass Container: For cooling and storing any leftover sauce. A mason jar with a tight lid keeps it fresh for days.
With these basics, you’re fully equipped to make a teriyaki sauce that tastes better than takeout.


Ingredients for the Quick Homemade Teriyaki Sauce
Every ingredient in this sauce has a purpose, bringing flavor and function to the mix:
- Soy Sauce: The salty, umami-rich base that defines teriyaki. Use low-sodium if you prefer to control salt levels.
- Brown Sugar: Adds a deep sweetness that caramelizes beautifully and balances the saltiness.
- Garlic Powder: A touch of garlic adds warmth and depth without overpowering.
- Ground Ginger: Gives the sauce its signature zing and slightly spicy undertone.
- Honey (Optional): For extra sweetness and a glossy finish.
- Rice Vinegar: Introduces a slight tang that brightens the entire sauce.
- Sesame Oil: Just a splash for rich, nutty aroma and authentic depth.
- Cornstarch + Water (Slurry): This duo thickens the sauce to that luscious, clingy consistency we all love.
- Sesame Seeds & Green Onion (Optional Garnish): These finish the sauce with a bit of crunch and color, especially when used for dipping or drizzling.
How To Make the Quick Homemade Teriyaki Sauce
Step 1: Combine the Core Ingredients
In a small saucepan over medium heat, whisk together the soy sauce, brown sugar, garlic powder, ground ginger, rice vinegar, and sesame oil. If you’re using honey, add it in now as well. Stir until the sugar dissolves completely.
Step 2: Simmer to Marry Flavors
Allow the sauce to heat and gently simmer for about 2-3 minutes. This helps the flavors deepen and meld. Stir occasionally so the sugar doesn’t settle or burn.
Step 3: Thicken the Sauce
In a small bowl, whisk together the cornstarch and cold water to form a slurry. Slowly pour this into the simmering sauce, whisking constantly. The sauce will begin to thicken within a minute.
Step 4: Adjust and Finish
Once thickened to your liking (usually 1-2 minutes after the slurry), remove the pan from heat. Taste and adjust—add a touch more honey for sweetness, or a splash of vinegar for tang if needed.
Step 5: Serve or Store
Pour the sauce into a clean jar or use immediately over your favorite dish. Garnish with sesame seeds and chopped green onion if serving fresh.
How to Serve and Store Your Teriyaki Sauce
Once you’ve made this rich and glossy Quick Homemade Teriyaki Sauce, the ways to use it are practically endless. Drizzle it over steamed rice and grilled veggies, toss it with stir-fried noodles or shrimp, or use it as a marinade for chicken, tofu, or beef. It’s also incredible as a dipping sauce for potstickers or crispy egg rolls.
To store, let the sauce cool completely before transferring it into an airtight glass jar or container. Keep it refrigerated for up to one week. The sauce will thicken slightly in the fridge but loosens up beautifully when warmed. You can reheat it on the stove or in the microwave with a splash of water if needed.
Frequently Asked Questions
What can I use instead of cornstarch to thicken the sauce?
You can substitute arrowroot powder or tapioca starch. If you’re avoiding starch altogether, reduce the sauce longer on low heat to thicken naturally.
Can I make this sauce ahead of time?
Absolutely! In fact, it often tastes even better the next day as the flavors deepen. Store it in a sealed jar in the fridge and reheat when needed.
Is this sauce gluten-free?
If you use tamari or a certified gluten-free soy sauce, then yes. Just make sure all other ingredients, like the vinegar, are also gluten-free.
Can I freeze teriyaki sauce?
Yes! Pour the cooled sauce into a freezer-safe container or silicone ice cube trays. Thaw in the refrigerator or warm gently to use.
How do I make it spicy?
Add a pinch of red pepper flakes or a dash of sriracha during cooking to introduce a kick of heat without altering the overall flavor.
Why did my sauce turn too thick?
It likely simmered a bit too long or had too much cornstarch. Just add a splash of water and whisk over low heat to thin it back out.
Want More Sauce and Marinade Ideas?
If you love the bold, sweet-savory flavors of this teriyaki sauce, you’ll definitely want to explore more flavorful sauces and marinades that elevate your meals:
Try the Garlic Butter Shrimp Scampi Lasagna if you’re looking for a seafood dish that blends creamy richness with garlicky brightness.
Or, go bold with Spicy Honey Sriracha Chicken with Noodles—its sweet heat combo is a dream pairing with any homemade sauce.
For comfort food lovers, the Buffalo Chicken Lasagna Recipe layers spice and tang, perfect with a mild teriyaki drizzle for contrast.
And don’t skip One Skillet Smoky Garlic Butter Parmesan Steak Pasta, where a spoonful of teriyaki adds unexpected depth to the savory profile.
Finally, the Sticky Garlic Sesame Cauliflower from my air fryer recipes is another excellent canvas for experimenting with this homemade sauce.
Pin and Tell Me How Yours Turned Out
You can save this to your sauce and marinade boards for next time. Just click the Pin button.
If you make it, I’d love to hear how it turned out. Did you tweak the sweetness? Add chili flakes? Use it as a glaze? Leave a comment below—I’m always curious how others bring their version to life.
For even more ideas, check out my daily recipe inspiration and new creations on Pinterest at LadyPlate on Pinterest.

Quick Homemade Teriyaki Sauce
- Total Time: 8 minutes
- Yield: 3/4 cup
- Diet: Vegetarian
Description
This Quick Homemade Teriyaki Sauce is glossy, flavorful, and packed with umami. Perfect for stir-fries, grilled meats, or dipping, it’s a pantry-friendly alternative to store-bought sauces. It comes together in under 10 minutes and stores beautifully for the week.
Ingredients
1/2 cup soy sauce (low-sodium recommended)
1/4 cup brown sugar
1/2 teaspoon garlic powder
1/2 teaspoon ground ginger
1 tablespoon honey (optional)
1 tablespoon rice vinegar
1 teaspoon sesame oil
1 tablespoon cornstarch
2 tablespoons water
1 teaspoon sesame seeds (optional garnish)
1 tablespoon chopped green onion (optional garnish)
Instructions
1. In a small saucepan over medium heat, whisk together the soy sauce, brown sugar, garlic powder, ground ginger, rice vinegar, sesame oil, and optional honey until the sugar dissolves.
2. Let the mixture simmer for 2–3 minutes to deepen the flavor. Stir occasionally.
3. In a separate bowl, mix the cornstarch with water to create a slurry.
4. Slowly pour the slurry into the saucepan, whisking constantly to avoid lumps.
5. Continue cooking and stirring until the sauce thickens (about 1–2 minutes).
6. Remove from heat and taste. Adjust sweetness or tang if needed by adding more honey or vinegar.
7. Garnish with sesame seeds and chopped green onion if desired.
8. Serve immediately or store in an airtight container for up to one week in the refrigerator.
Notes
Always dissolve the cornstarch in cold water before adding—it prevents clumping and ensures a smooth sauce.
Use low-sodium soy sauce to avoid overpowering saltiness and to give room for seasoning adjustments.
If the sauce thickens too much after refrigeration, reheat gently with a splash of water to loosen the consistency.
- Prep Time: 3 minutes
- Cook Time: 5 minutes
- Category: Sauce
- Method: Stovetop
- Cuisine: Japanese-American
Nutrition
- Serving Size: 2 tablespoons
- Calories: 40
- Sugar: 5g
- Sodium: 460mg
- Fat: 1g
- Saturated Fat: 0g
- Unsaturated Fat: 1g
- Trans Fat: 0g
- Carbohydrates: 8g
- Fiber: 0g
- Protein: 1g
- Cholesterol: 0mg
